


Explore Words of Experience from Korey Constable, guest stories for Fruit-Powered Magazine.
This month you get to learn about something fun, even though not quite health-related: bending grass!
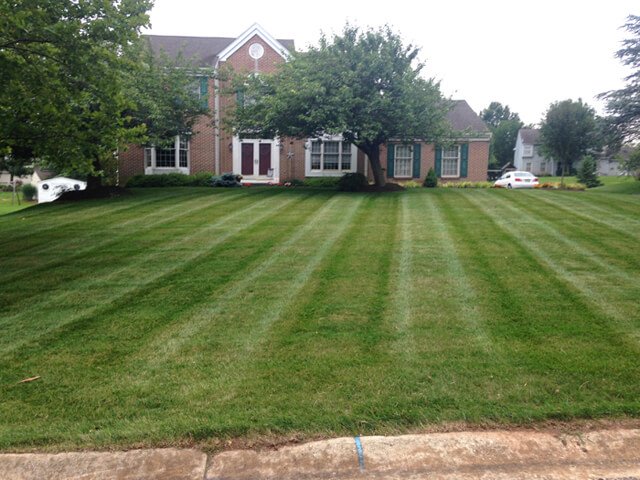
What is Bending Grass Anyway?
This is basically the verb version of the lawn stripes I mentioned last month. In order to create that American Flag or Wrigley Field look that most of my lawn customers want, you must first learn how to bend grass. This desirable lawn look requires the Three C’s (not unlike diamonds) if you want the stripes to look good: cut quality, concentration and consistency.

Cut Quality
It all begins with blade sharpness, as mentioned in last month’s article, and is an absolute necessity if you want your lawn to remain green. The longer blades go without sharpening the blades, the browner the grass will get, and the more uneven the lawn will look. Do yourself and your lawn a favor and catch up on blade maintenance in last month’s article.
For me, the quality of the cut does not depend solely on the cleanness and evenness of recently cut grass blades but also involves the amount of visible grass clippings and consistency of the mowing patterns. While the general rule of thumb is to refrain from cutting more than one-third of the length of the grass, which can result in more visible clippings, sometimes this is not possible without inconvenience such as being out of town for more than a week or not being able to cut it due to rain. When this happens, simply cut the lawn more than once to break up the clippings, preferably when dry. This means cutting the grass so it looks nice, rather than cutting it to keep it from getting high.
Grass clippings belong on the lawn and only the lawn—not in the street, walkways or mulch beds, so be sure to discharge the clippings away from these areas whenever possible and remember that wet grass sticks to everything. As long as grass is dry, it does not matter how high it is. A good mower will eventually break up the clippings into very small pieces, even if the grass is 3 feet high! Refrain from bagging the lawn or raking up clippings because they provide essential nutrition for the soil. It also helps when the underside of a mower deck is free of grass buildup.
Concentration
As with everything, the perfect-looking lawn requires practice, which requires effort, thus keeping it fun. Otherwise, it is nothing but a chore, so one may as well make the process fun. When I first started doing lawns with the desire to make my stripes stand out, it required intense concentration to keep the mower straight, requiring continuous steering input. Even though I usually mow in straight lines, steering input is required to keep the lines looking straight mostly due to bumps in the lawn, changes in the mower’s center of gravity and so forth.

If you want to learn how to fly airplanes, mowing lawns with the desire to make nice, straight stripes is a great way to get started, believe it or not! For example, landing an airplane is not a static process even though it may appear so on the outside. The yoke, or control stick in an airplane, usually sees the most action in the shortest amount of time right before an airplane touches down. This is why landings are considered the most difficult part of physically flying. Anyone can mow lawns, just like anyone can fly airplanes, but straight lines and smooth landings require concentration, which requires practice!
Consistency
Lawn stripes are optical illusions. The contrast between mowing patterns is not a variation in color or even leaving the grass uncut in every other pass, as some old ladies have thought, but actually shadows caused by mowing in a certain direction. If you’ve ever watched someone mow away from you, you would notice that stripe would be light due to the angle of the grass blades from the mower going in that direction. Alternately, dark stripes will appear whenever the grass blades are angled toward the viewer.
As long as the lines are straight and the mowing patterns are an equal distance apart with less than 2 inches of overlap on both sides, it will not matter if you have weeds in your lawn because all eyes will be focused on the stripes. Any deviation in the patterns will disturb the flow and direct attention to that deviation, so consistency is the key. In order to ensure a clean cut, overlapping the previous mowing pattern is necessary as long as the overlap is not much more than 2 inches. Anything more creates unwanted lines on the lawn.
Step-by-Step Guide to Lawn Striping
If the aforementioned directions make no sense, I don’t blame you. Not many people understood why I was particular about creating perfect lawn stripes back when I was first starting out. Now that lawn stripes are an American fad, I get requests to incorporate them into the lawn. Perhaps this step-by-step guide will help.
Although you can use any size mower, at least a 36-inch or larger mower is ideal. The larger the mower, the less noticeable inconsistencies are. It does not matter if the mower is a walk-behind or a riding mower—just about any mower will do.
1. Plan stripe placement. Figure out where you want the lines to be most visible such as from a road. In that case, you would mow to and from the road, either perpendicular to it or at an angle.

2. Mow the perimeter. Make one to two passes around the perimeter of the property including the driveway and house. The mowed perimeters is where you will be making the majority of your turns. After this, the only thing you need to focus on is keeping the lines straight.
3. Establishing the baseline. Aim the mower toward a fixed object at or beyond the edge of the property line. Try to mow the longest distance from the starting to the finishing point that you can find because this will be your baseline. All the other lines will be based on this starting line, so it is critical that this line is straight. Start this line and keep your eyes on the fixed point. No matter what happens, do not take your eyes off this point, even if you have an itch or a bee lands on you. Once at the target, check to make sure the line you just mowed is perfectly straight. If it is not, go back and start over.

4. Making the rest of the lines. After making the baseline, mow next to the line you just made in the opposite direction while maintaining a 2-inch overlap. Continue to maintain focus on making the line straight. Once the second line is finished, you will notice a light stripe and a dark stripe. The light stripe is the first line you mowed, and the dark stripe is the second line. Start the third line by mowing alongside the area you just mowed, the dark stripe. Once at the end, you will see that the first line is now dark, and the second line is now light. This is due to the angle of the grass in relation to your viewpoint—a light line on one side will always be dark when viewed from the opposite end. As long as you mow next to all the dark lines, your stripes will be a contrasting light/dark variation. Mowing next to a light line will “double” the width of the stripe, which can come in handy when creating your own mowing patterns.

5. The next mows. The next time you mow, the stripes should still be visible. If they are barely visible, mow the same patterns as previously described. Use the stripes as your guide by staying over all the light ones and keep the mowing patterns consistent with those stripes so that you are basically making the original stripes more prominent. The next time you mow (or the second time you mow if the stripes are clearly visible), make new stripes as described in the steps above, but this time, mow perpendicular to the previous stripes so that they criss-cross. By the time you are done, the lawn should look like a checkerboard. Continue to alternate the stripes every time you mow. You may have the desire to add a third striping direction after a month or two of going over the prior stripes.


Advanced Grass Bending
Bear in mind I am writing this article from Greater Philadelphia, where lawn stripes can last a couple of months if left unmowed. If you live in the southern United States, it may require more of an effort to create lawn stripes because the grasses there are tougher to bend. You may need to do further experimenting with your mower to maximize the striping effect such as adjusting your mower deck (or mower) so that it is a quarter-inch lower in the front than the back and looking into striping kits, which can be anything from solid rubber to fancy lawn rollers, which you attach to a mower. You can even make your own striping kit, which is fairly easy to do for a do-it-yourselfer.
Once you become proficient at this, you may want to experiment with bending your lines so the stripes curve in a consistent fashion. Or you could come up with your own creation. The lawn is, after all, your canvas, and the mower your paintbrush.

Check out Korey’s transformation story!
Everything is very open with a very clear clarification of
the issues. It was definitely informative. Your website is extremely helpful.
Thanks for sharing!